🖥️ Linux Administration Setup Guide - Spring 2025
Name: Raphael Adeshiyan
Professor: Adrianna Holden-Gouveia
Course: Spring 2025 Linux Administration (CIS-245-O1A) (1322.202501)
Assignment: Getting your system set up Pt1
This guide will walk you through setting up Ubuntu Server and CentOS Server as virtual machines (VMs) on a Windows machine using Hyper-V. This is a useful setup for learning about server administration, testing software, or creating a development environment.
💻 Host System Specifications
- RAM: 16GB total. We'll allocate 4GB to each server VM, leaving 8GB for the host operating system.
- Host OS: Windows 11 with Hyper-V enabled.
⚠️ Note: Hyper-V is a feature that allows your computer to create and manage virtual machines. You can enable it in "Turn Windows features on or off" in the Control Panel.
💡 If you need help with that, search for: "enable hyper-v windows 11". - Storage: 500GB total disk space. Each server VM will initially have a 20GB virtual hard disk.
- Dynamic Disk Sizing:
- Virtual hard disks are set to dynamic, meaning they start small and only grow up to 20GB as needed.
- If the 20GB limit is reached, the virtual disk will automatically expand further, provided there's enough space on the host drive.
🐧 Part 1: Setting up Ubuntu Server on Hyper-V
🔗 Download Ubuntu Server
- Visit: https://ubuntu.com/download/server#system-requirements-lts
- Download the latest LTS (Long-Term Support) version.
- ⚠️ Be sure to select Server, not Desktop.
- Save the ISO file to a location you can easily find.
⚙️ Create a New Virtual Machine in Hyper-V
- Open Hyper-V Manager (search in Start Menu).
- In the Actions pane, click New > Virtual Machine....
- Read the introduction and click Next.
🏷️ Specify Name and Location
- Name: Ubuntu Server
- Optional: Change VM storage location.
- Click Next.
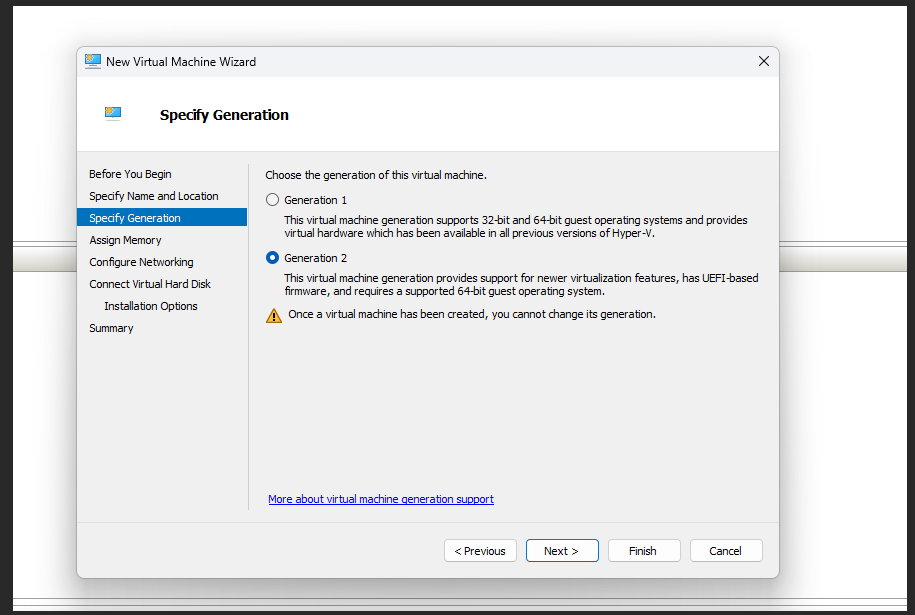
🧬 Specify Generation
- Select Generation 2.
- Click Next.
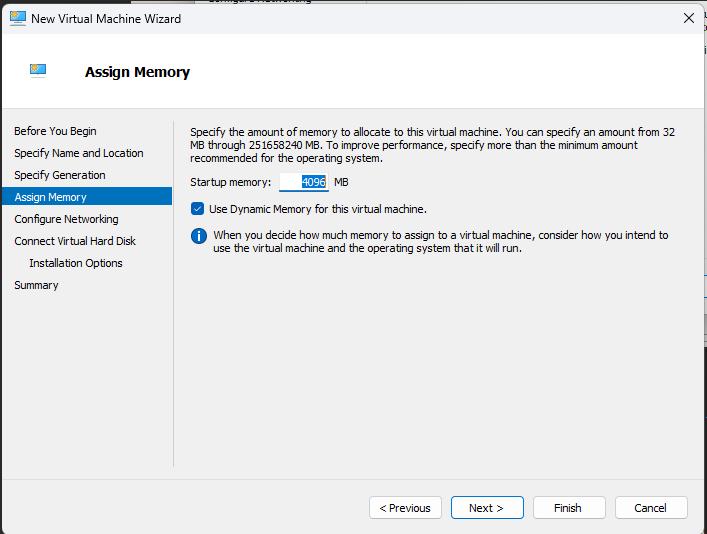
💾 Assign Memory
- Set 4096 MB (4GB) for startup memory.
- ✅ Leave Dynamic Memory enabled.
- Click Next.
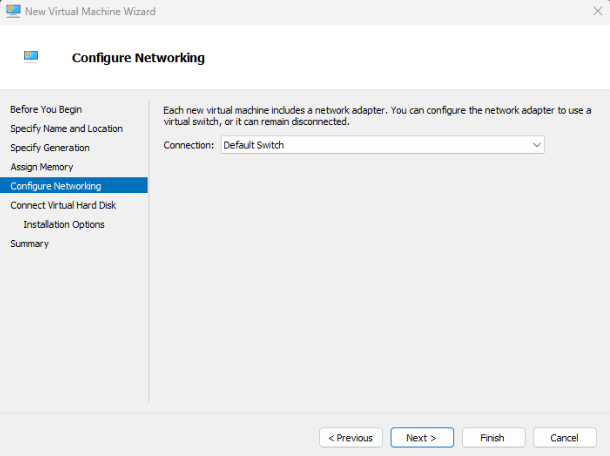
🌐 Configure Networking
- Choose Default Switch Select Default Switch from the connection dropdown. The Default Switch allows your VM to connect to the internet using your host machine's network connection. We are choosing default because it is the simplest configuration for the purposes of the lab. This will assign your server a dynamic IP address via DHCP
- Click Next.
📀 Connect Virtual Hard Disk
- Select Create a virtual hard disk.
- Name: UbuntuServerDisk
- Size: 20GB (dynamically expanding).
- Click Next.
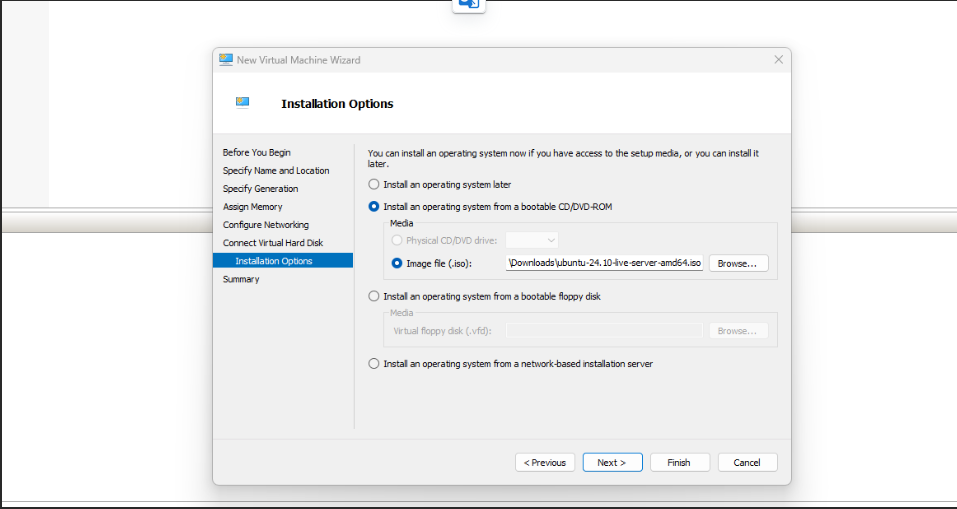
💿 Installation Options
- Choose Install an operating system from a bootable CD/DVD-ROM.
- Select Image file (.iso) and browse to your Ubuntu Server ISO.
- Click Next.
✅ Summary
- Review settings and click Finish.
- Click Finish to create the virtual machine.
🚀 Install Ubuntu Server
- Right-click the VM in Hyper-V Manager, select Connect....
- Click Start (green play button).
- Ubuntu Server installer will boot.
🧩 Installation Steps
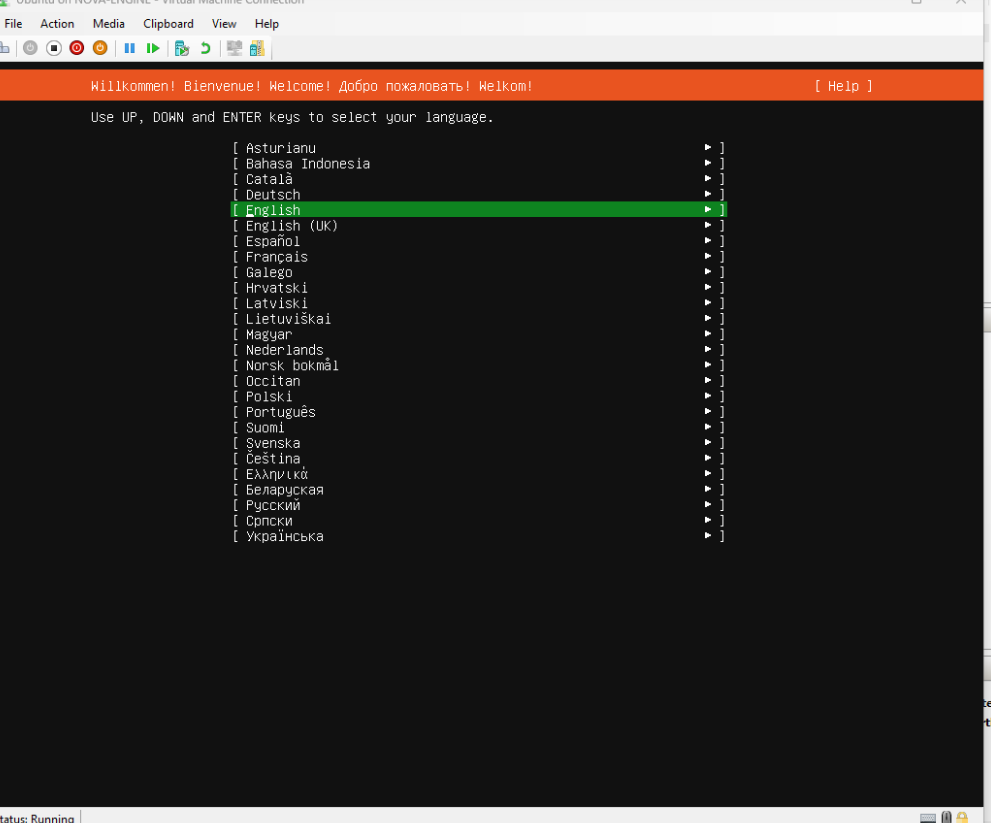
- Language: Select preferred language.
-
Keyboard Configuration: Set keyboard layout.
-
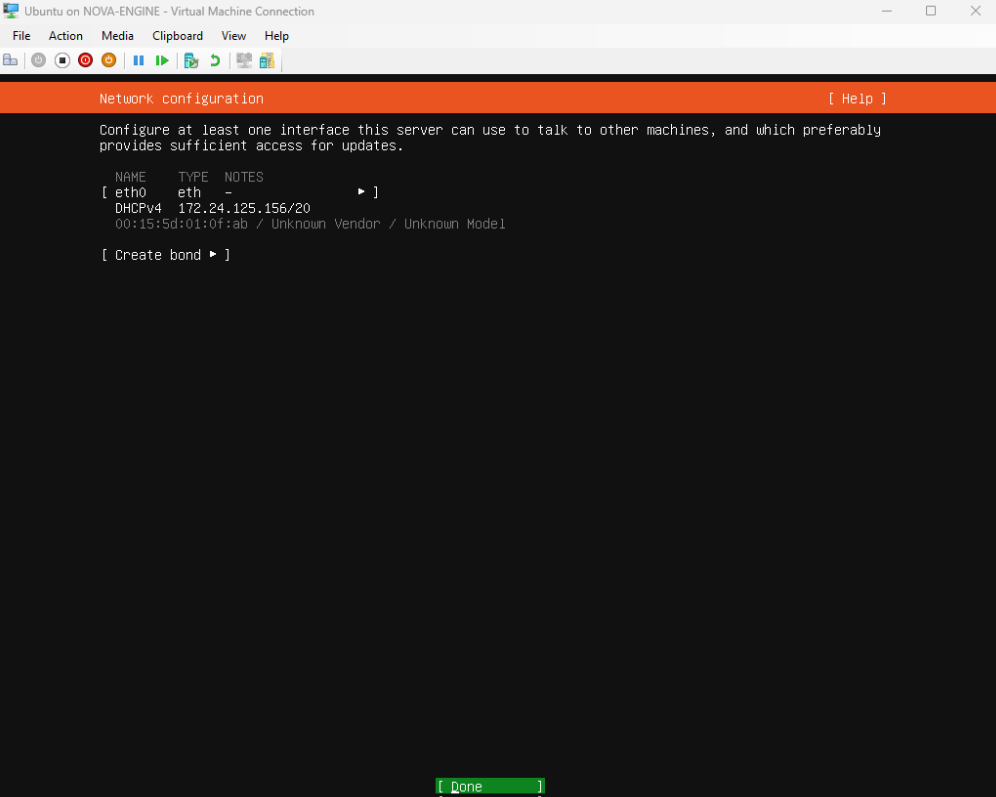
Network Connections:
- Automatic DHCP configuration (via Default Switch) should work.
- If automatic setup fails, manual network settings may be required.
- ✅ Select Done.
-
Proxy: Leave blank (if not behind proxy), click Done.
-
Mirror: Accept default, click Done.
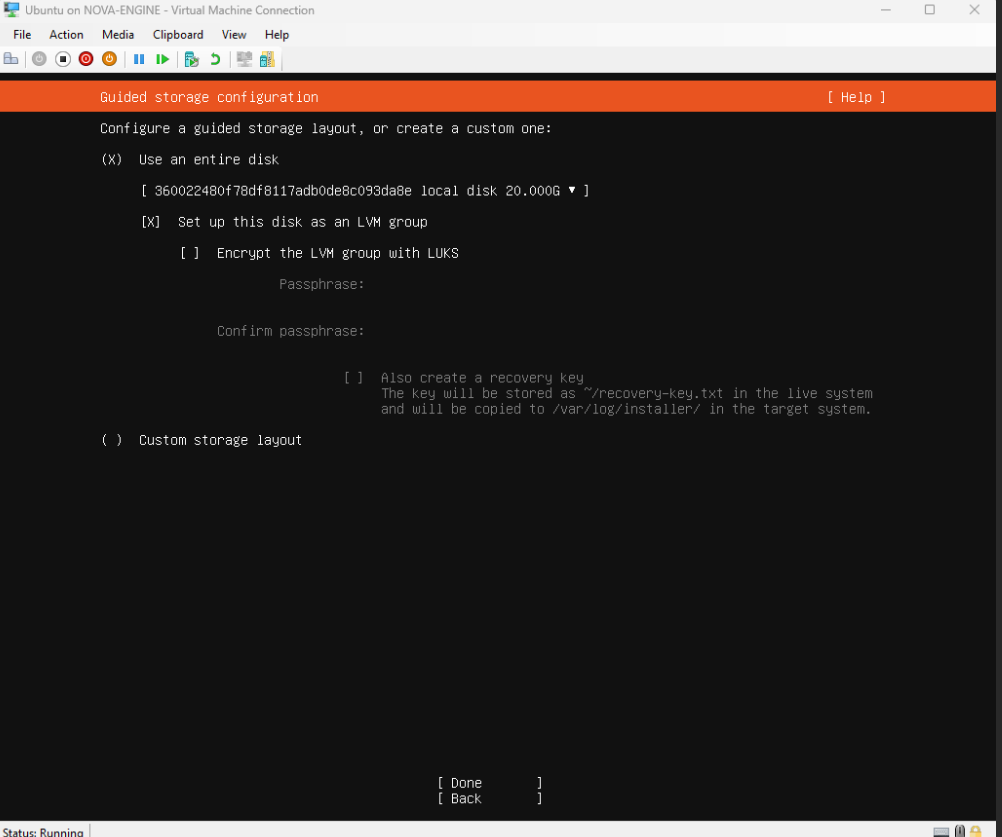
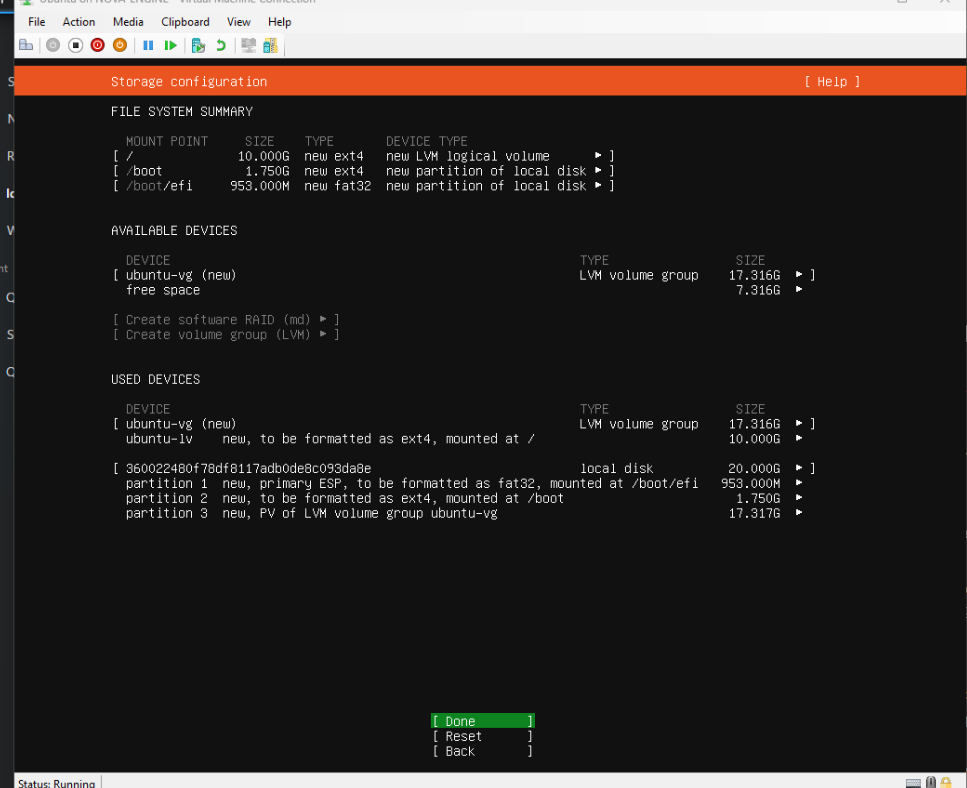
💽 Storage Configuration (Disk Partitioning)
- Choose Use an entire disk.
- Select the 20GB virtual disk.
- Confirm proposed layout.
- ✅ Select Done.
- Confirm disk erasure: Select Continue.
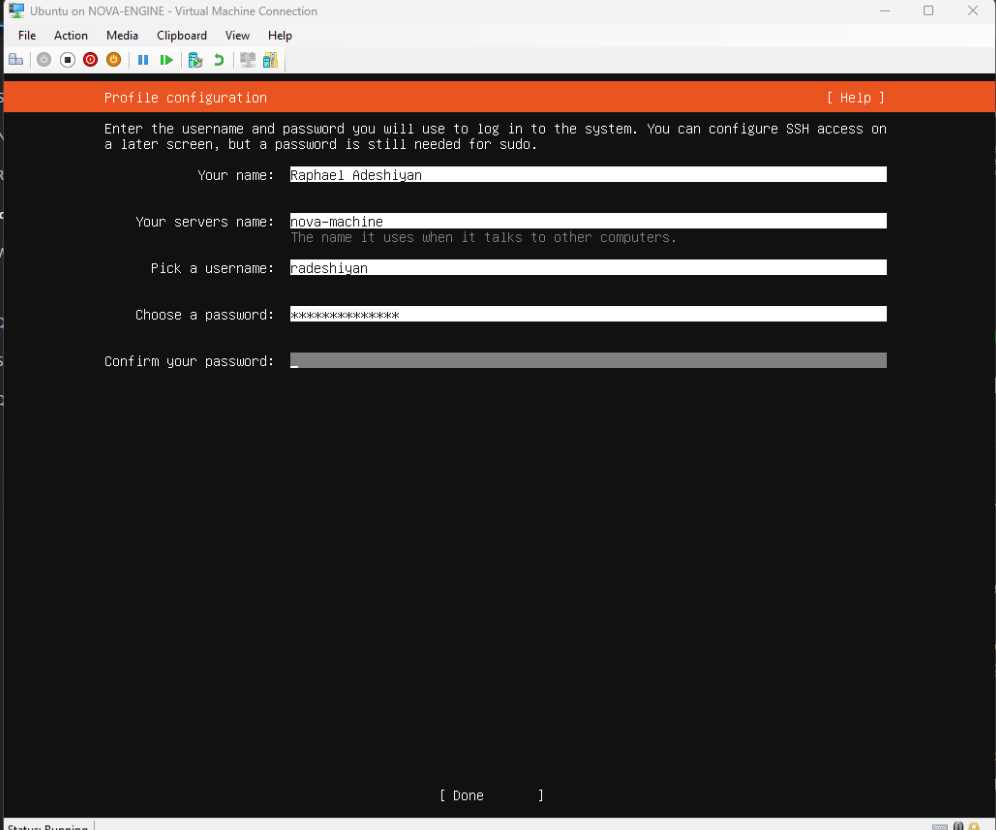
👤 Profile Setup
- Enter name, server name, username, and password.
- ✅ Select Done.
🔐 SSH Setup
-
✅ Select Install OpenSSH server by pressing the spacebar. This is important because it allows you to connect to your server remotely from your host machine (or other machines) using an SSH client (like PuTTY on Windows or the ssh command on Linux/macOS). Leave "Import SSH identity" set to No
-
Import SSH identity: No.
-
✅ Select Done.
🧰 Featured Server Snaps
- Skip.
- ✅ Select Done.
📥 Installation
- Installer runs (may take time).
- ✅ Select Reboot Now.
⚠️ You can ignore the "remove installation medium" message — Hyper-V handles this automatically.
🔄 Update and Upgrade
After reboot:
-
Log in with your username and password.
-
Run:
sudo apt update
sudo apt upgrade
sudo= run as admin.apt update= refreshes package list.apt upgrade= installs updates.- Confirm with y if prompted.
🐧 Part 2: Setting up CentOS Server on Hyper-V
🔗 Download CentOS Server
- Visit: https://www.centos.org/download/
- Download the latest CentOS Stream ISO.
- Save the ISO file.
⚙️ Create a New Virtual Machine in Hyper-V
Follow the same steps as Ubuntu, but:
- Name: CentOS Server
- Select the CentOS Stream ISO during installation options.
🚀 Install CentOS Server
- Start and Connect to the CentOS VM.
- CentOS installer (Anaconda) boots.
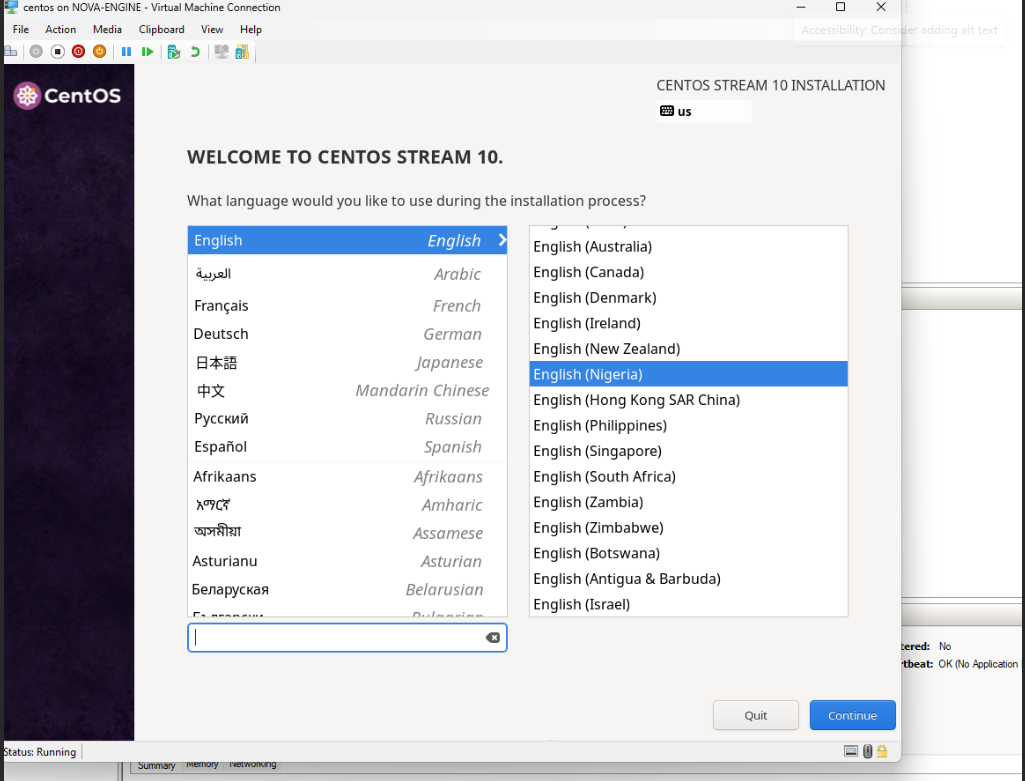
🧩 Installation Steps
- Language: Set language and click Continue.
- Installation Summary: Overview of settings.
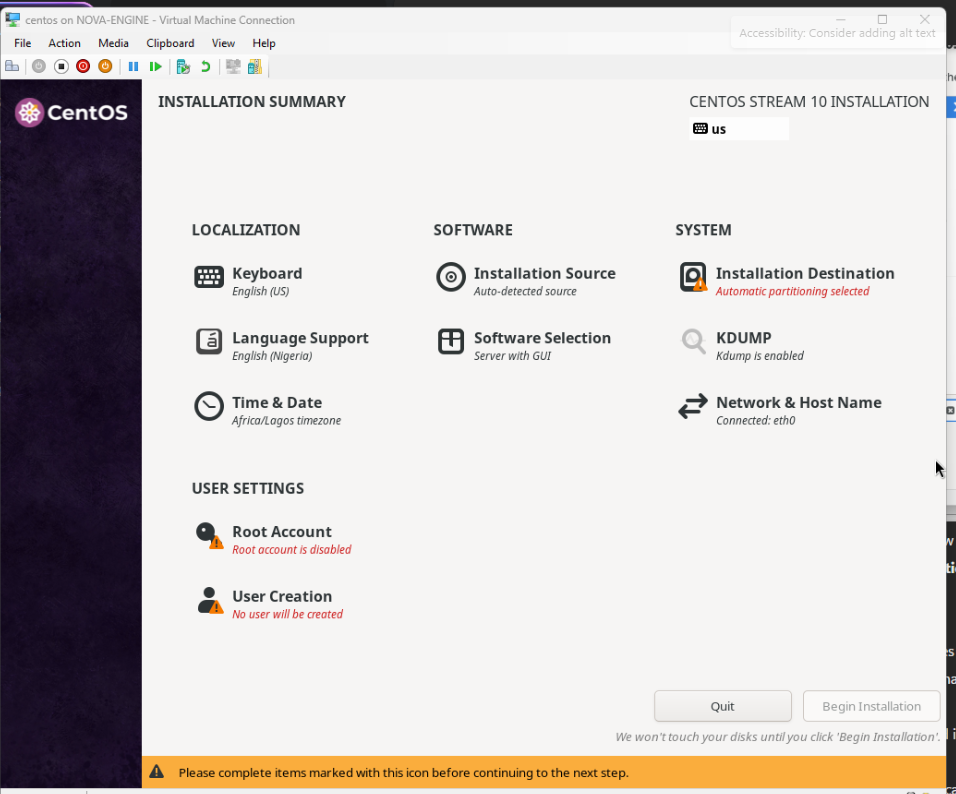
🌍 Localization
- Keyboard: Set layout.
- Language Support: Add languages if needed.
- Time & Date: Set timezone (enable NTP for auto-sync).
📦 Software
- Installation Source: Leave as Auto-detected.
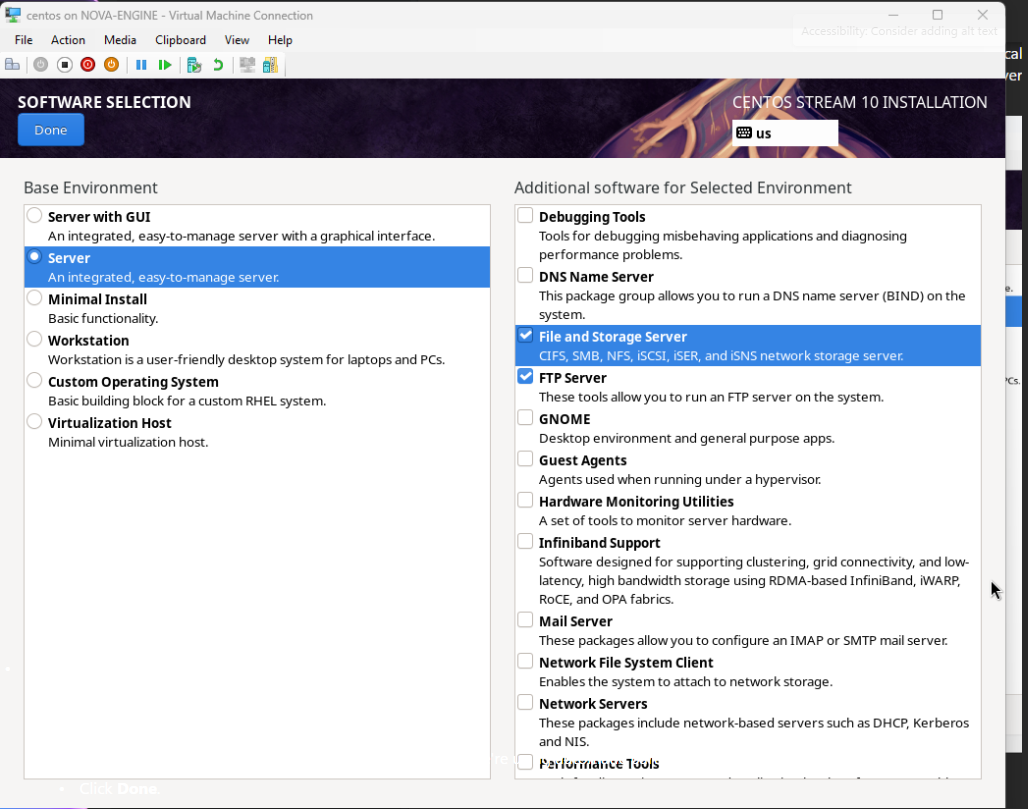
- Software Selection:
- Choose Server with GUI (or Minimal Install for CLI-only).
💽 System
- Installation Destination:
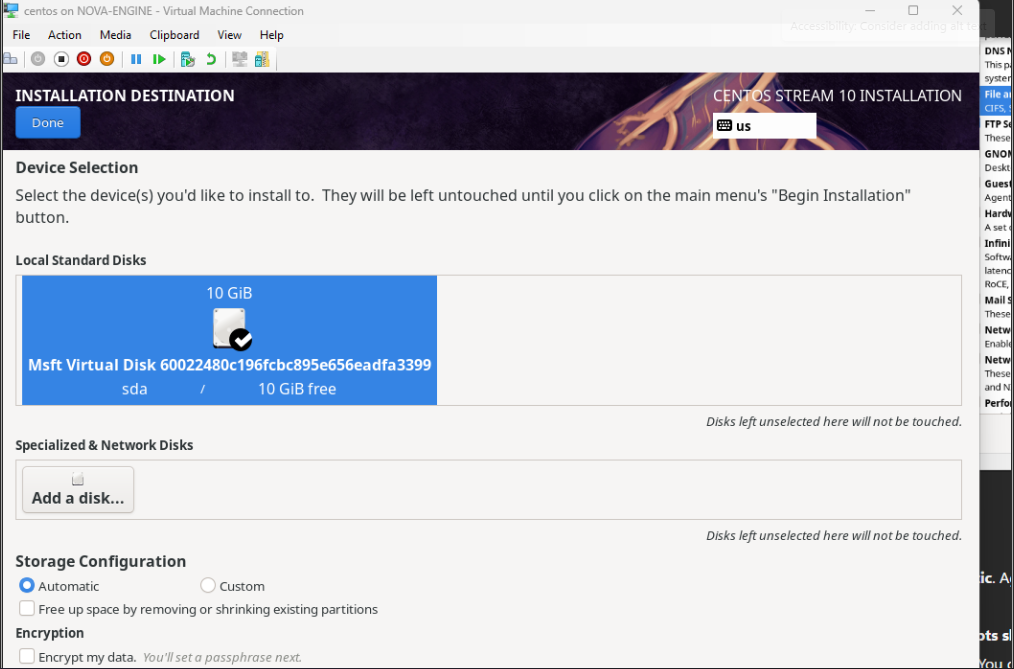
-
Select 20GB disk.
-
Choose Automatic partitioning.
-
✅ Click Done.
-
KDUMP: kdump is a crash dumping mechanism. You can leave it enabled (default).
-
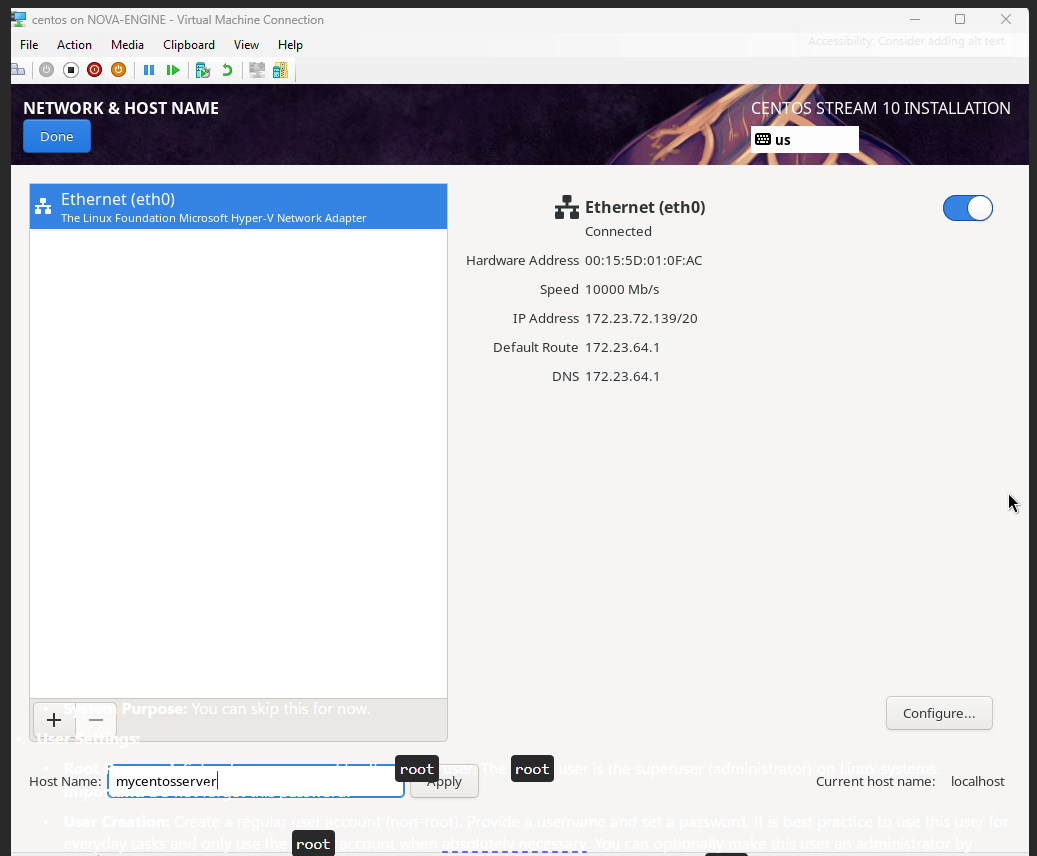
Network & Host Name:
- Enable the Default Switch connection (turn to ON).
- DHCP should assign IP automatically.
- Set hostname (e.g., mycentosserver).
- Optionally configure advanced settings.
- ✅ Click Apply then Done.
- Security Policy: Skip.
- System Purpose: Skip.
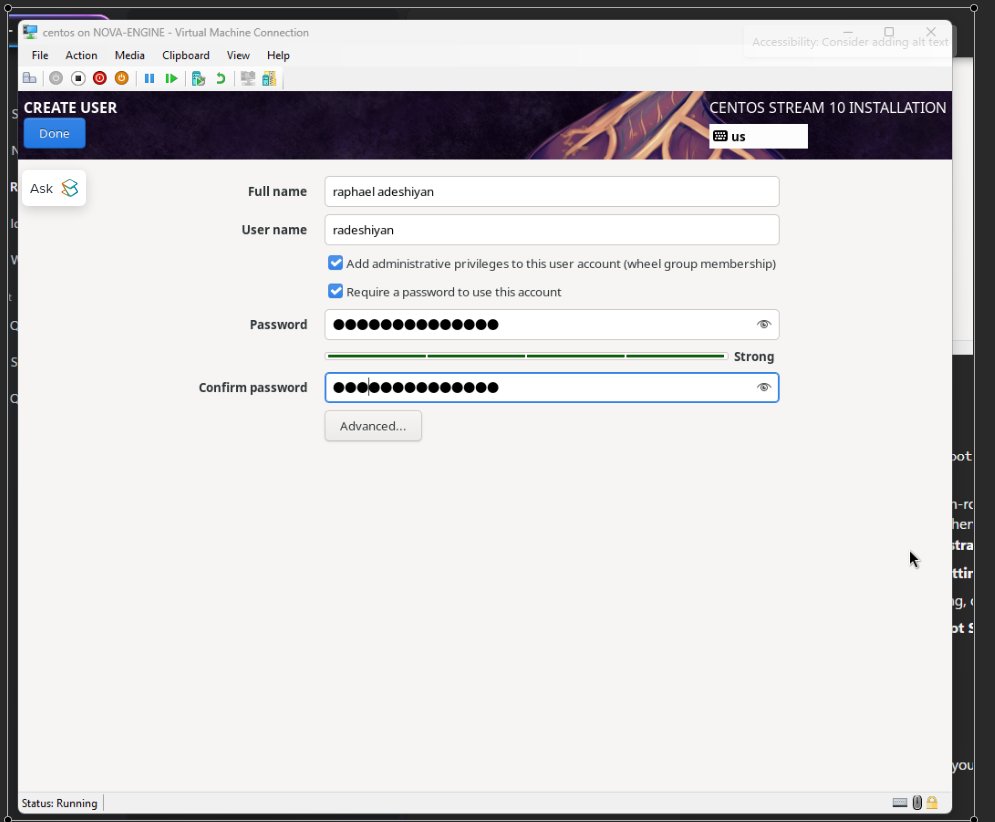
👥 User Settings
- Root Password: Set strong root password.
- User Creation:
- Create a regular user account.
- Optionally make user administrator (for
sudoaccess).
🚀 Begin Installation
- Click Begin Installation.
- After completion, click Reboot System.
🔄 Update and Upgrade
After reboot:
-
Log in with created user.
-
Run:
sudo dnf update
dnf= CentOS package manager.sudo= run as admin.- Confirm with y if prompted.
🎉 Conclusion
You now have two virtual machines:
- ✅ Ubuntu Server
- ✅ CentOS Server
💻 You can access these servers:
- Via Hyper-V console.
- ✅ Or remotely using SSH (e.g., PuTTY or
sshcommand).